

Knowing how to indent text in Google Sheets means working around a missing feature, since Sheets has no native indent button. After testing 5 different methods, I'll walk you through which ones work best depending on your data.
Why Google Sheets doesn't have an indent button
Google Sheets doesn't have an indent button because Google never built that formatting option into the toolbar. Excel offers indent as a built-in cell alignment feature, but Sheets only includes basic alignment options like left, center, and right.
If you press Tab inside a Sheets cell, you won't indent anything. You'll just jump to the next cell over, which can mess up your layout if you're not expecting it. I ran into this myself the first time I tried to organize a project tracker with sub-tasks under main tasks. I kept pressing Tab and watching my cursor jump across the row instead of indenting the text like I wanted.
Because there's no native fix, you'll need to use a workaround instead. The good news is there are a few solid ones, and I'll walk through each one below.
Method 1: Add spaces manually
Adding spaces manually is the fastest fix if you only need to indent a few cells. Click into the cell, place your cursor before the text, and press the space bar a few times to push the text over.
This works fine for small, one-off jobs. I use it when I'm cleaning up a quick list and don't need anything fancy.
There's a catch though. The width of your indent depends on the font and font size you're using, so the same number of spaces can look different from cell to cell. It's also easy to undo by accident if you delete the wrong characters.
Method 2: Copy a tab space from Google Docs
Using a formula lets you indent text while keeping your data dynamic, which is helpful if your sheet updates often. There are two main functions you can use for this, CHAR and REPT, plus a way to indent only specific rows with IF. Once the formula is in the first cell, you can extend it down the column with the fill handle in Google Sheets instead of retyping it.
Before you use this method, here are a few things to keep in mind:
Dynamic, not static: Formulas update automatically if your source data changes, so you won't need to manually reapply the indent.
Takes up a formula column: Since the indent lives inside a formula, you'll need a separate column if you want to keep your original data untouched.
Conditional logic adds flexibility: Combining IF with REPT lets you indent based on rules instead of indenting every row the same way.
Now let's break down how each function works.
CHAR(32)
CHAR(32) inserts a single space character into a formula. Type an equal sign, then CHAR(32), then an ampersand, then the text or cell you want to indent.
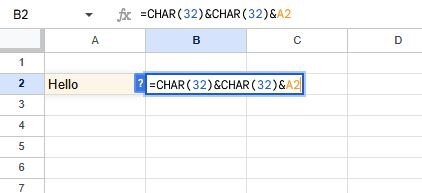
For example, =CHAR(32)&CHAR(32)&A2 adds two spaces before whatever is in cell A2. You can add more CHAR(32) sections if you need a wider indent.
REPT("space",n)
REPT works the same way but lets you set the number of spaces in one step instead of stacking CHAR functions. Type an equal sign, then REPT(" ",n) where n is the number of spaces you want, then an ampersand, then your text or cell reference.
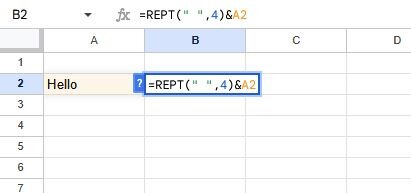
For example, =REPT(" ",4)&A2 adds four spaces before the contents of A2. This is a faster option if you need a wider or more specific indent.
Conditional indenting with IF and REPT
You can combine IF with REPT to indent only the rows that meet a certain condition. This comes in handy with campaign data, where you might want to indent ad sets under their parent campaign but leave the campaign row alone.
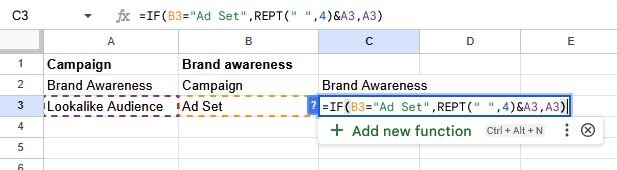
For example, =IF(B2="Ad Set",REPT(" ",4)&A2,A2) checks if column B says "Ad Set." If it does, it indents the value in A2 by 4 spaces. If not, it leaves A2 as is.
Method 4: Use a helper column
Using a helper column lets you create the look of indentation without touching your original data at all. Your source column stays clean with this method, since the indent effect comes from a separate column instead of changes to the text itself.
You will need to keep this helper column in place, which can clutter your sheet if you're already tight on space. The upside is that it holds up well visually, since it doesn't rely on spaces inside your text and won't break apart when you sort or filter the rest of your data.
Now let's walk through how to set it up:
Step 1: Insert a column to the left of your data
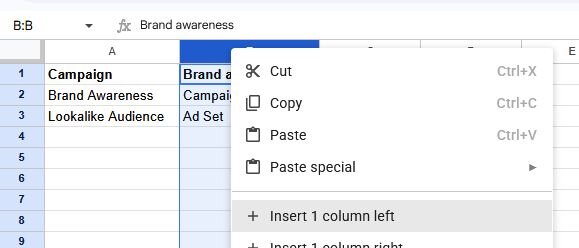
Right-click the column header next to the column you want to indent and select "Insert 1 column left." This gives you an empty column to work with.
Step 2: Resize the helper column
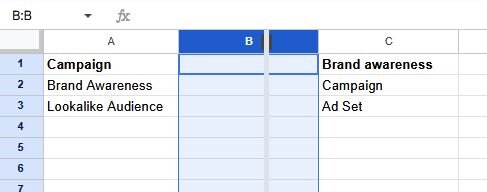
Click and drag the right edge of the new column's header to shrink its width. The narrower you make it, the smaller the indent will look.
Step 3: Merge the header cells
If your data has a header row, select the first cell in both your helper column and your data column, then click the merge cells icon in the toolbar. This keeps your header looking clean instead of split across two columns.
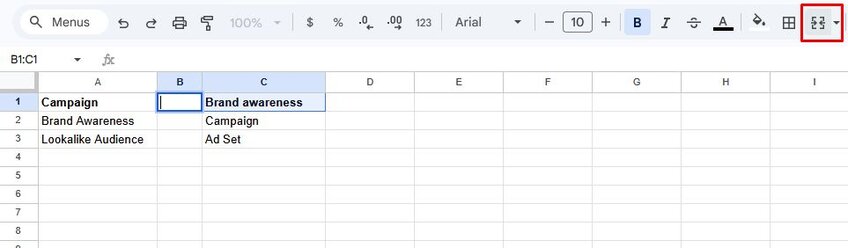
Once it's set up, anything in the data column will visually appear indented, since the narrow helper column pushes it to the right.
Method 5: Use custom number formatting
Custom number formatting lets you apply a consistent indent to a cell or an entire column without changing the text itself. It's a good middle ground between manual spacing and a full formula, since it takes about 10 seconds to apply and holds its shape across the whole column.
Your original cell content stays untouched with this method, since the formatting sits on top of the data rather than inside it. The trade-off is that it works best for text. If your cells contain numbers, the indent can sometimes interfere with how the values display.
Now let's walk through how to set it up:
Step 1: Select your cells
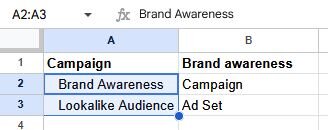
Click the cell or highlight the range you want to indent.
Step 2: Open the custom number format menu
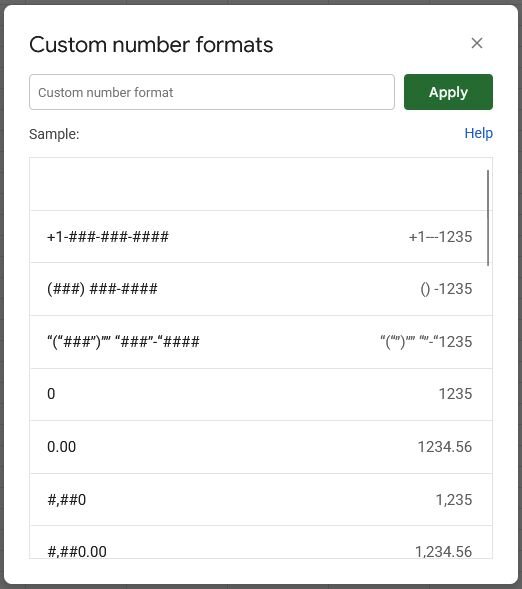
Go to Format, then Number, then Custom number format. A small dialog box will open with a text field at the top.
Step 3: Add your spacing
In the text field, type however many spaces you want for your indent, then add the @ symbol directly after. The @ tells Sheets to display whatever text is in the cell. More spaces means a wider indent.
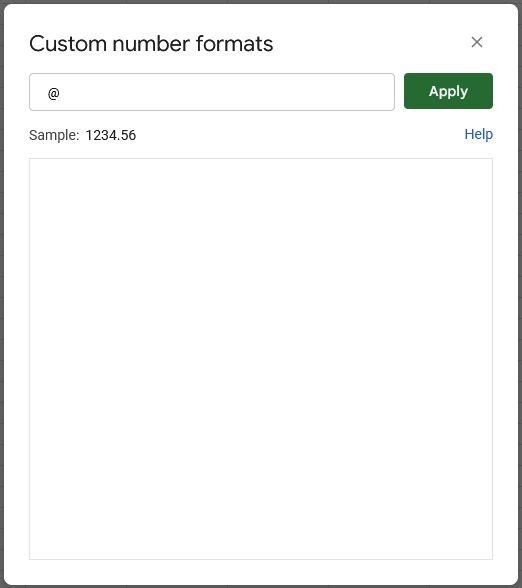
Step 4: Click Apply
Hit Apply and your selected cells will shift over. The formatting saves automatically, so you can reapply it to other cells later by going back to Format, Number, and selecting it from your recent formats.
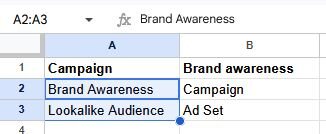
I use this one a lot when I'm setting up a report that needs subcategory rows to sit slightly right of the main category rows. It takes seconds and doesn't mess with any of the underlying data.
Which method should you use?
The right method depends on how much data you're working with and whether your sheet changes often. A quick one-off list calls for a different fix than a campaign tracker you update every week.
Here's how the 5 methods compare:
| Method | Best for | Holds up when sorting or filtering | Effort level |
|---|---|---|---|
| Add spaces manually | A handful of cells you won't touch again | No | Low |
| Copy a tab space from Google Docs | Small lists needing a slightly wider indent | No | Low |
| Use a formula | Sheets that update often or need conditional indenting | Yes | Medium |
| Use a helper column | Large sheets where you can't risk touching the original data | Yes | Medium |
| Custom number formatting | Cells that need a consistent look without editing the text | Yes | Low |
If your data barely changes, a quick manual fix can work fine. But if you're managing something that updates often, like a campaign tracker or task list, a formula or helper column will save you from redoing the work every time your data shifts.
Looking for less manual spreadsheet work? Julius can help
Knowing how to indent text in Google Sheets can help your rows look organized, but formatting alone won't fix messy, scattered data sitting across multiple spreadsheets. If you're spending more time tidying cells than analyzing what's actually in them, that can be a sign you need something built for analysis, not just formatting.
Julius is an AI-powered data analysis platform that can search for public data or connect directly to your existing sources, then return charts, insights, and reports from a single prompt.
Here's how Julius can help:
Data search: Julius can search the web for public datasets or pull structured financial data for 17,000+ companies through its Financial Datasets integration, so you can start from a question instead of a spreadsheet.
Direct connections: You can link databases like PostgreSQL, Snowflake, and BigQuery, or connect tools like Google Ads, so your reports pull from live data instead of a sheet you have to update by hand.
Repeatable Notebooks: You can save an analysis as a Notebook and run it again whenever your data updates, with the option to schedule it to send fresh results to email or Slack.
Smarter over time: Julius includes a Learning Sub Agent, an AI that adapts to your database structure as you use it, learning table relationships and column meanings so your results get more accurate with use.
Built-in data visualization: You can generate charts, bar graphs, and other visuals on the spot, so you're not stuck manually formatting a spreadsheet to show the same hierarchy you'd get from a quick prompt.
Ready to ask a question and get an answer instead of building another spreadsheet? Try Julius for free today.
Frequently asked questions
Can I align text in Google Sheets?
Yes, you can align text in Google Sheets using the alignment options in the toolbar. Select your cell or range, then choose left, center, or right alignment for horizontal placement, or top, middle, and bottom for vertical alignment. These options control position only and won't create the nested, indented look a workaround like REPT or custom formatting gives you.
Can you use the Tab key to indent in Google Sheets?
No, the Tab key does not indent text in Google Sheets. Pressing Tab moves your cursor to the next cell instead of adding space within the current one. To indent text inside a cell, you'll need a workaround like custom number formatting or a REPT formula.
Can I indent multiple cells at once in Google Sheets?
Yes, you can indent multiple cells at once using custom number formatting. Select the full range of cells you want to indent, then apply the same custom format through Format, Number, Custom number format. This applies the indent to every selected cell in one step instead of formatting each one individually.