

Creating a content calendar in Google Sheets just takes one shared table with the right columns. Every publish date, channel, and status stays in one place, with no new tool required.
I've built these for a one-person blog and for teams juggling 4 channels at the same time. The columns are what trips people up every time.
Here's the 6-step build I use, the free template that comes with it, and when a spreadsheet stops cutting it.
Why build your content calendar in Google Sheets
A content calendar in Google Sheets works because you don't have to open anything new to use it, and it doesn't slow you down with extra clicks or a learning curve.
I've handed this exact setup to teams who were drowning in Slack threads and half-finished drafts, and it tends to hold up better than they expect.
Before you build anything, here's why it earns its spot:
- It’s free: Anyone with a Google account can use it, so there's no new subscription to justify to finance.
- It’s collaborative: Your whole team can edit the same sheet in real time, which kills the "which version is current" problem.
- It’s customizable: You control every column, color, and filter, so the calendar bends to your workflow.
I'll be upfront about the one caveat: A spreadsheet plans your content, but it doesn't publish it. There's no auto-scheduler and no post preview. For most solo creators and small teams I've worked with, that trade was well worth the zero-dollar price tag. We’ll talk more about where it runs out of room later.
Columns to include in your content calendar
Start with the core set below, then add optional columns only if you'll actually keep them updated:
| 📋 Column | 🎯 What it tracks | 🧩 Priority |
| Publish date | When the piece goes live | Core |
| Title or topic | What the piece is | Core |
| Channel | Blog, newsletter, LinkedIn, YouTube | Core |
| Status | Idea, drafting, scheduled, published | Core |
| Owner | Who's responsible | Core |
| Link | The draft or published URL | Core |
| Keyword | Target search term | Optional |
| CTA | The action you want readers to take | Optional |
| Campaign | The promotion or launch it supports | Optional |
| Performance | Views, clicks, or engagement after publish | Optional |
The 6 core columns answer the only questions that matter day to day: what's going out, where, when, who owns it, and is it ready. Add optional columns as needed, like a keyword column once you start planning around SEO.
How to create a content calendar in Google Sheets: 6 steps
You can build this calendar in about 20 minutes with a blank sheet and 6 steps. Each step adds one piece:
Step 1: set up your sheet and tabs
Open a new Google Sheet and give the file a clear name, like "2026 Content Calendar." I've opened way too many spreadsheets named "Untitled spreadsheet (14)" trying to find the right one, so a real name saves you that hunt later.
Next, decide how you'll split things up. Two approaches work well:
- One tab per month: Cleaner to scan, and easy to duplicate as you roll forward. Best if you plan month by month.
- One rolling tab for the year: Better for spotting themes across months, but it gets long fast. Best if you like a bird's-eye view.
Either one holds up. I lean toward a tab per month when I'm working with a team, and a single rolling tab when it's just me running the show.
Step 2: add your header row and first entries
Type your core columns into the header row, bold them, and center the text so they stand out from everything below. Then add two or three real rows so the structure feels less abstract and more like your actual plan.

Keep one piece of content per row. A single blog post gets its own line with its date, channel, status, owner, and a link to the draft. If a newsletter promotes that same post, that's an additional row.
As the calendar grows, entries pile up and every so often a row gets pasted in twice. When that happens, clear out the duplicate so your counts and filters stay honest.
💡 Tip: Once your header row is in, freeze it so it stays put as you scroll. Click View, then Freeze, then 1 row (or 2 rows if you're keeping a title row above your headers).
Step 3: add status and channel dropdowns
Free text is quick to get started with, but it can break your calendar. One person types "Draft," another types "drafting," and now no filter catches both rows. Dropdowns close that gap before it opens.
Select your Status column, click Data, then Data validation.
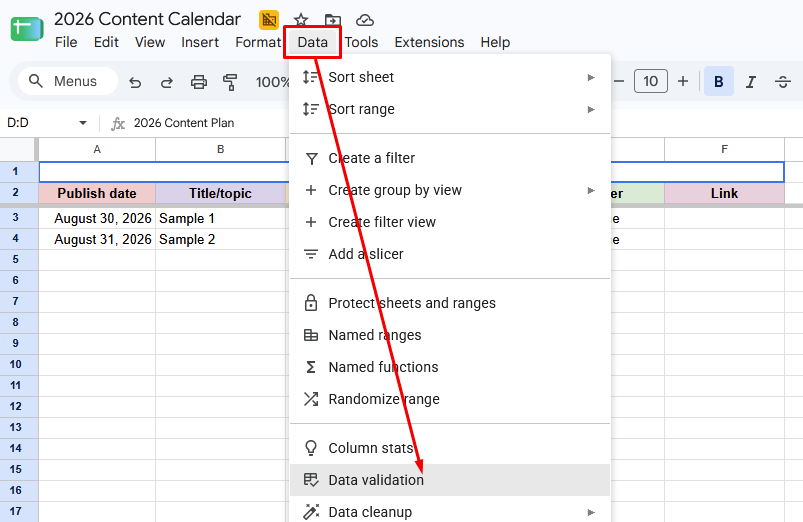
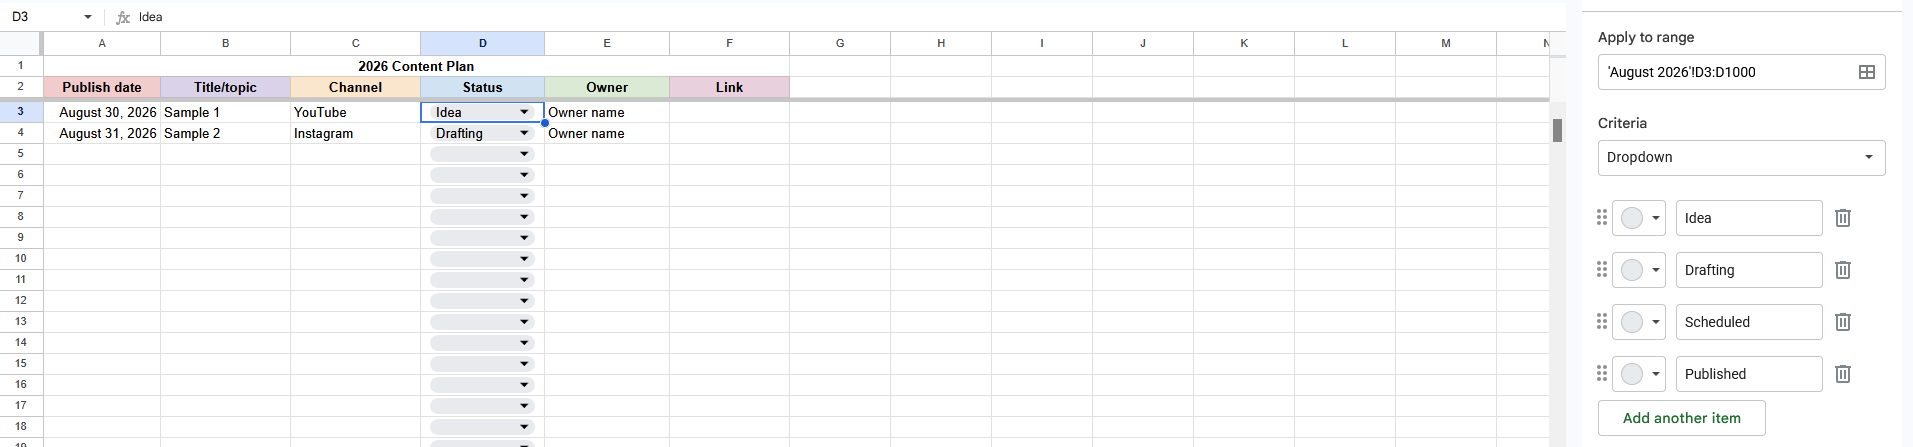
Add a dropdown with your set values, something like idea, drafting, scheduled, and published.
Do the same for the Channel column, using the platforms you post on.
💡 Tip: Reuse the exact same status labels everywhere in the sheet. Consistent values are what make your filters and color rules work later, so it's worth locking them down now.
Step 4: color-code by status or channel
Color turns a wall of text into something you can read at a glance. The goal is to see the shape of your month without reading a single cell.
You can set this up right inside your dropdown. Select the Status column, click Data, then Data validation, and open the dropdown you already built in Step 3. Next to each value, you'll see a color swatch, so set the colors you want.

The cell colors itself automatically once you select that value. You can do the same for the Channel column if you wish.
Done well, the color view doubles as a quick reporting layer and can help you use your content calendar as an operational dashboard.
Step 5: add filter views to slice your calendar
Once you have a month of entries, you'll probably want ways to see just one slice at a time, like everything on LinkedIn, everything you own, or everything still stuck in drafting.
Use a filter view to do this. Click Data, then Create filter view. A new filter bar appears above your header row.
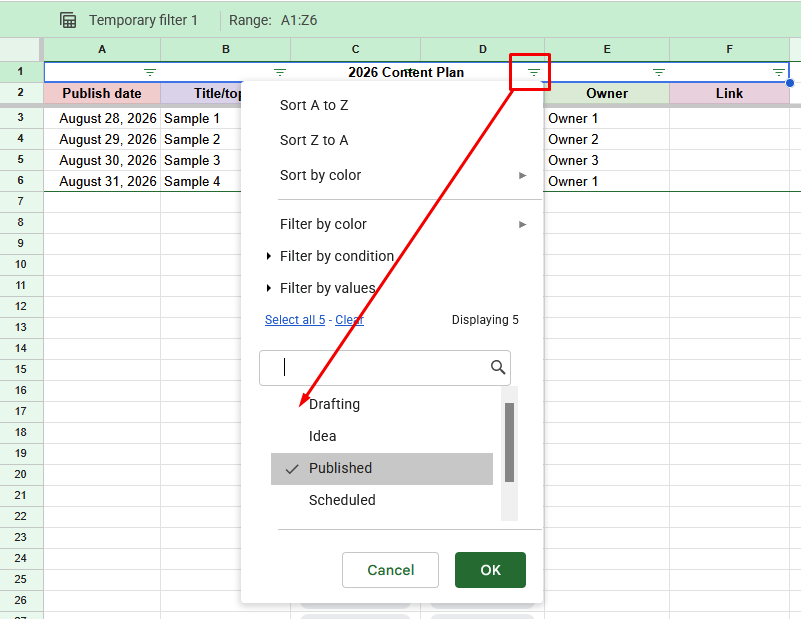
Click the filter icon on the column you want to slice by (Channel, Owner, or Status), uncheck the values you don't want to see, and click OK. When you’re happy with all the filters you’ve set up, click Save view.
Give the view a name when you save (like "YouTube only" or "Not published yet"), so you can find and reopen it later.
💡 Tip: Set up a few filter views you can reuse. One by channel, one by owner, and a "not published yet" view that becomes your live to-do list. Sort any of them by publish date, and you've got your next-up queue in one click.
Step 6: automate the repetitive parts
The calendar only helps if you keep it current, so cut the tedious data entry wherever you can.
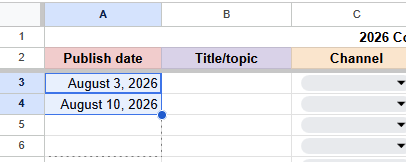
Automate recurring dates first. If you publish every Tuesday, type the first two dates, select them, and drag the fill handle down to extend the series. Google Sheets picks up the pattern for you. There's more you can do with autofill once you get comfortable with it.
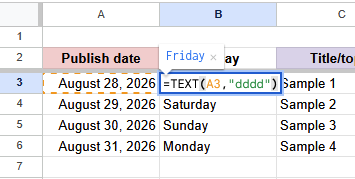
A light formula touch helps too. A quick =TEXT(A3,"dddd") next to a date shows the weekday automatically, so you can see at a glance that a post lands on a Saturday when you didn't mean it to. You can autofill the rest of the column the same way.
If you're drafting column ideas or first-pass titles, Sheets now has AI formulas that can generate a batch for you, assuming your plan has Gemini enabled. They're a solid starting point, though I still rewrite most of what they hand back.
Optional: add a visual month view
The table is the real calendar, and it's all most people need. But if you like a wall-calendar grid to see a whole month, you can manually create one on a second tab.
Start by adding a new tab (click the + at the bottom left) and naming it something like "August month view"
Across row 1, in cells A1 through G1, type =TEXT(COLUMN(),"dddd") into the first cell, then drag the fill handle right through G1. Each cell picks up the next weekday automatically, so you'll get Sunday through Saturday across the row.

Below that, type the date numbers directly into the cells they land on, working row by row until you fill the month. It takes a minute longer than a formula, but there's no pattern to break and nothing to double-check after.
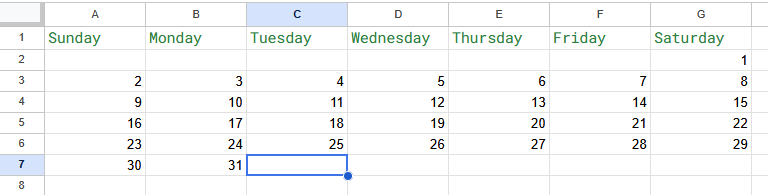
Here, you can drop a short note or a colored block into each day's cell to mark what's publishing.
Share your calendar and keep it a living document
A content calendar only works if it's the one place everyone trusts. Share the file with edit or comment access, and agree on who updates what.
The real trick is treating it as a living document. When a date slips or a topic changes on a call, update the sheet right then instead of trusting yourself to remember later.
When you're ready to plan the next month, right-click the tab and duplicate it. You keep your columns, formatting, and dropdowns, and the new month is ready to go almost immediately. Just delete the previous month’s content, and you’re good to go!
Download a free content calendar template
If you'd rather skip the setup and start filling in dates, this template has the same columns, dropdowns, and color-coding already built in.
To make it yours, click File, then Make a copy, and save it to your own Google Drive. From there, swap in your own channels and status values in the dropdown lists, and clear out the sample rows before you add your real content.
Grab your free monthly content calendar template.
When a Google Sheet stops being enough
I'm a fan of the spreadsheet approach, but it has limits, and it's worth knowing them before you outgrow one:
| ✅ A spreadsheet is plenty when | ⚠️ Consider a dedicated tool when |
| You're solo or on a small team | You're coordinating many people across brands |
| You're planning but not yet publishing | You need to schedule and post from the same place |
| A handful of channels | You want post previews before they go live |
| You track results by hand | You need built-in analytics and reminders |
Google Sheets won't schedule posts, preview them, or send you a nudge when a deadline is close. And once you're running several brands with hundreds of rows, it can start slowing down.
At that point, a dedicated social media scheduling and publishing tool (like HootSuite or SocialPilot) takes over the parts a spreadsheet was never built for, like queuing posts, previewing them, and reporting on results automatically.
Turn your content calendar into insight
A content calendar in Google Sheets is a running record of everything you've shipped, on which channel, and when. The payoff comes from reading that record, and that's the step a spreadsheet leaves to you. We built Julius for exactly that kind of question.
Julius is an AI-powered data analysis tool, so once you export or upload your calendar, your tracking becomes a source of answers.
Here's how Julius helps:
- Ask in plain English: Upload your calendar and ask "which channel did we publish most last quarter?" without writing a single formula.
- Built-in visualization: Ask for a bar chart breaking down your publish history by channel, and you can spot gaps or overloaded weeks at a glance.
- Data connections: Pull in a connected analytics account or database to tie publish dates to real performance instead of a rough estimate.
- One-click sharing: Send the analysis to your team next to the plan itself.
Your calendar already tracks every post you've made. Upload it to Julius and ask what it's telling you. Try Julius for free today.
Frequently asked questions
Does Google Sheets have a content calendar template?
No, Google's own template gallery only includes a generic Annual Calendar, and it isn’t one built for content planning. Plenty of free content calendar templates exist from other sources, though building your own still wins when you want the exact columns your workflow needs.
How do I make a content calendar in Google Sheets for free?
You make one for free by opening a new sheet, adding columns for date, title, channel, status, owner, and link, then adding dropdowns, color-coding, and sharing it with your team. Any Google account covers the whole thing at no cost.
What columns should a content calendar have?
A content calendar should have at least six core columns: publish date, title or topic, channel, status, owner, and asset link. Add keyword, CTA, campaign, and performance columns only when you'll keep them updated.
Can I make the dates fill in automatically in Google Sheets?
Yes, you can auto-fill recurring publish dates by typing the first two, selecting them, and dragging the fill handle to extend the series. A =TEXT() formula can also display the weekday for any date automatically.
When should I switch from Google Sheets to a dedicated content tool?
Switch when you need automated scheduling, post previews, built-in analytics, or you're managing many brands and channels at once. For solo creators and small teams, a well-organized sheet usually does the job.