

Making text fit in a Google Sheets cell is trickier than it should be. Type a full sentence and hit Enter, and it either vanishes behind the next column or spills sideways across three cells like a ransom note.
I've cleaned up more messy shared sheets than I'd like to admit, and the fix usually comes down to wrapping, clipping, or resizing the cell. I'll walk you through each one, plus the honest word on shrink to fit.
How to make text fit in a Google Sheets cell: 3 methods
Google Sheets doesn’t resize a cell on its own. Long text either spills into an empty neighbor or hides behind a full one. Either way, your text can vanish completely the moment you print or export to PDF. Fix it with wrap, clip, or resize:
1. How to wrap text in Google Sheets
Wrap is the fix I reach for most. The font size stays the same, the row grows taller, and the full entry stays visible on the screen:
- Select your cells: Highlight the cell, column, or range you want to wrap.
- Click the text wrapping icon: It's in the toolbar. If you don't see it, click the three-dot More menu (⋮) at the right end first.
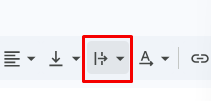
- Choose Wrap: It's the middle option in the dropdown.
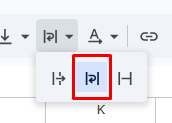
You can get to the same result through Format > Wrapping > Wrap if you'd rather skip the toolbar. Either route drops any text that runs past the column edge onto the next line and grows the row to fit it.
2. How to clip text in Google Sheets
Clip doesn't get much attention, but it's handy. It cuts the text off at the cell's right border so nothing spills into or hides behind a neighboring cell. The full entry is still in the cell, it just isn't all shown on screen. To clip text:

- Select your cells: Highlight the cell, column, or range you want to clip.
- Click the text wrapping icon: It's in the toolbar. Pick Clip from the dropdown.
You can also get there through Format > Wrapping > Clip if you'd rather skip the toolbar.
I reach for clip in dense tables, ID or code columns, and dashboards where every row needs the same height. It pairs well if you're also collapsing rows to keep a dashboard tidy.
Since clip hides part of the text on screen, widen the column when you need to read the full value, or click the cell and check the formula bar.
3. How to resize columns and rows to fit text
Sometimes resizing the cell does the job better than touching the text. You can resize by hand, or let Sheets auto-fit it for you:
- Auto-fit a column: Double-click the line just after the column letter, or right-click the header and choose Resize column > Fit to data. The column snaps to the width of its longest entry.
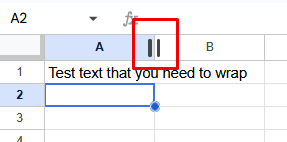
- Auto-fit a row: Right-click the row number, choose Resize row, then select Fit to data. This is the one most guides skip, and it's the fastest way to get a row to hug its content.
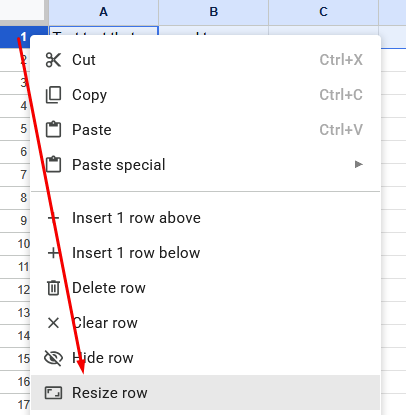
- Resize by hand: Hover over the border between two column letters or row numbers until the cursor turns into a double arrow, then drag. Select several columns or rows first if you want to resize them all at once.
Resizing keeps your font size intact, which can help when you're printing or exporting and want the layout to stay predictable. It pairs nicely with Smart Fill and autofill when you're setting up a sheet from scratch.
Once your columns and rows are sized the way you want, indenting text is worth knowing too. It doesn't fix overflow, but it's handy for organizing sub-items or building visual hierarchy within a column.
Add a line break exactly where you want it
Auto-wrap decides where your text breaks, but it doesn't always pick the spot you'd choose. If you're formatting a multi-line address, a label, or anything where the line break itself carries meaning, you’re better off placing it yourself:
- On Windows or ChromeOS: Double-click into the cell, put your cursor where you want the break, and press Ctrl + Enter.
- On Mac: Same steps, but press Ctrl + Enter or Cmd + Enter instead.
Sheets inserts the break right where your cursor sits and keeps the rest of the entry in the same cell. I use this most for addresses and short labeled fields, where a random auto-wrap break in the middle of a word or phrase looks sloppy on a printed sheet or an export.
Shrink to fit in Google Sheets: the honest answer
Google Sheets has no shrink-to-fit option. The Wrapping menu only gives you Overflow, Wrap, and Clip, and there's no setting that automatically shrinks the font to squeeze long text into a fixed cell. That's an Excel feature, and Sheets never added it.
If you searched for "shrink to fit" and came up empty, you're not missing a menu. It genuinely isn't there.
Here's what to do instead:
- Clip and widen: Set the cell to Clip, then widen the column until the text you care about shows.
- Shrink the font by hand: Drop the font size a point or two (Format > Text > Font size, or the toolbar) while keeping the row height fixed.
- Wrap and accept taller rows: If seeing everything matters more than a fixed font size, wrap it and let the row grow.
Which method should you use?
Each method solves a different problem, so picking the right one comes down to what you're optimizing for:
| 🧭 Method | ✅ Choose it when | 🔧 What changes |
| Wrap | Long text and readability come first, and taller rows are fine | Row height grows, font stays the same |
| Clip | You need a fixed, tidy layout, like a dashboard | Nothing overflows, but some text is hidden on screen |
| Resize | You're printing or exporting and want the font untouched | Column width or row height changes |
When in doubt, wrap it. It's the safest default for shared sheets where other people need to read every word.
How to stop cells from expanding with text
This is the flip side of everything above, where instead of making a cell grow to fit text, you want the row to hold its height no matter what you type into it.
Rows expand because wrapping is turned on, which forces the row to grow with the text. Switch the wrapping to Clip or Overflow, and the row height stays put.
To lock the height in place:
- Select the rows: Click the row number, or drag across several row numbers if you want to lock more than one.
- Right-click a selected row number: From the drop-down menu, choose Resize row.
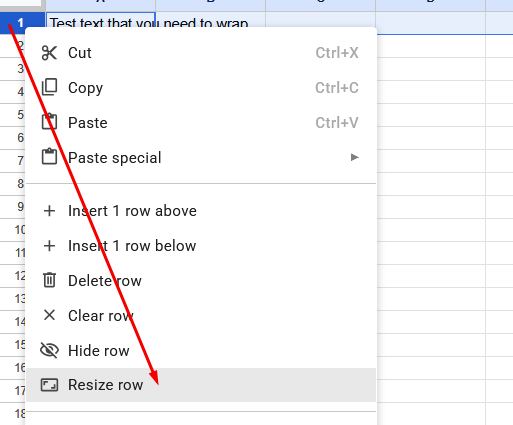
- Pick Specify row height: Select the Specify row height option and enter a pixel value. Click OK.
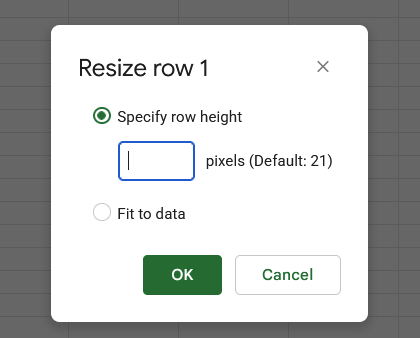
Once this is set, your rows hold that height no matter how much text goes into them. If a row seems to vanish entirely afterward, check that it isn't hidden before you start troubleshooting the height.
How to make text fit in Excel cells (quick version)
Excel uses different menus, but wrapping and resizing work the same way. It also has a built-in shrink-to-fit option that Sheets never added. Here’s a quick rundown:
- Wrap Text: Select your cells, then go to the Home tab and click Wrap Text.
- AutoFit: Select your cells, then go to Home > Format > AutoFit Column Width or AutoFit Row Height. Or use the shortcuts Alt, then H, O, I for column width, or Alt, then H, O, A for row height.
- Shrink to fit: Select your cells, right-click and choose Format Cells (or press Ctrl+1), open the Alignment tab, then check Shrink to fit. This is the automatic font-shrinking Sheets lacks.
- Merge & Center: Select the cells you want to combine, then click Merge & Center on the Home tab. Works well for headers that need to span several columns.
Spend less time formatting and more time on the answers
Wrapping, clipping, and resizing make text fit in a Google Sheets cell, but formatting only gets you to readable. The next question is usually what the data actually means, and even AI-powered formulas in Sheets only get you part of the way there. We built Julius for this gap.
Julius is an AI data analysis tool that works like a pocket data scientist. Describe what you want in plain English, and you get a shareable chart or report.
Here’s how Julius can help:
- Ask in plain English: Tell Julius to clean up, summarize, or chart a sheet, and skip the manual formatting entirely.
- Search for data: Julius can pull public data or company financials for more than 17,000+ companies into a usable dataset, so you're not limited to what's already sitting in a sheet.
- Connect your own data: Bring in private datasets by connecting sources like Postgres, Snowflake, BigQuery, Google Ads, and Google Drive.
- Get faster answers from every connection: The Learning Sub Agent studies the tables and relationships in your connected databases, so answers arrive faster and more precisely with each use.
Ready to spend less time on formatting and more time on what your sheet is telling you? Try Julius for free.
Frequently asked questions
Why does my text overflow into the next cell in Google Sheets?
Text overflows because the default wrapping setting is Overflow. Long text spills into empty neighboring cells and hides behind filled ones, even though the full entry is still there. Switch the cell to Wrap or Clip to fix it.
Does Google Sheets have a shrink to fit option?
No, Google Sheets does not have a shrink-to-fit option. The Wrapping menu offers only Overflow, Wrap, and Clip. To fit more text, wrap it, clip it, resize the column or row, or lower the font size by hand. Excel has Shrink to fit; Sheets doesn't.
How do I make a cell fit text automatically?
Auto-fit a column by double-clicking the right border of its header, or right-click the column and choose Resize column > Fit to data. For height, right-click the row number and pick Resize row > Fit to data.
Is there a keyboard shortcut to wrap text in Google Sheets?
Yes. On Windows, press Alt, then O, then W, then W to wrap text (or Alt, then H, then W if compatible spreadsheet shortcuts are turned on). On Mac, press Control + Option + O, then W, then W. If Alt opens your browser's menu instead (common on Firefox), use the toolbar Text wrapping icon or Format > Wrapping > Wrap.
How do I make text fit in a cell in Excel?
Make text fit in Excel with Wrap Text or AutoFit on the Home tab, or turn on Shrink to fit under Format Cells > Alignment. Merge & Center works well for headers that need to span multiple columns.